Saturday, July 14, 2018

Danish Cast Iron

My boyfriend is originally from Denmark. His family is still there, so we visit when we can. We usually bring back things like bedding, duvet covers, and sometimes kitchen items. 

A couple years ago, the Danish pan that we always use for baked pasta was getting pretty worn out, so we decided to buy another one when we visited. Scanpan is a popular, high quality brand for pots and pans, which originates in Denmark, but has also made its way to the US, so this is the brand we decided to purchase on the advice of the salesperson at the kitchen store. Sadly, one item that has been unavailable in the US until recently is the roasting pan that we purchased. The Scanpan Classic 5.5 Quart Roasting Pan measures 15.25"x10.5". If you're in the market for cast iron bakeware, and don't want to use your standard round cast iron for the job, consider this pan as an alternative. It has all the great features of glass, including easy cleanup (like I've watched baked cheese just slide right off!) but with all the even cooking and browning of cast iron, but it's also dishwasher safe!

It also comes in a 3½ and 7½ quart versions.

I think you'll love it as much as we do!

Thursday, April 12, 2018

What I Learned from Looking at Octogon Pans

How much do you love your cast iron? It's perfect for cooking so many things! I'll admit, mine is used most for two things: cornbread and chicken pot pie (this recipe is so yummy!) I don't use my cast iron every day though. The pieces I have aren't for everything. I have one pan I use exclusively for cornbread. I'm sure that confuses some people, but it's been my cornbread pan since 1991. I bought it as the largest (12") of a three piece set. My ex-husband took the 10" one when we divorced, and I just got the smallest one, which is 8", out of storage. (Oh does it need some work! I'll be talking about that soon.) This pan hasn't stuck in years, because even though I cut cornbread in the pan before turning it out, it's well seasoned. One day I hope to pass it on to my grandchildren and teach them how to appreciate all that cast iron has to offer.

We use the same skillet year after year, just like generations before us, accepting that the design is what it is. The handles are sometimes not big enough, or feel like they're not the right shape to carry it safely, especially at cooking temperatures. When they offered silicone handles for us to add to out cookware, we were estatic.

Otherwise, our cookware was perfect for so many things, unless you used it for everything. Most of the people who use cast iron to that extent are in the food service industry, such as a chef or line cook. For most of us, the pour spouts on the edges of our cast iron are enough. Sure, they're a little messy when you pour out drippings, but we wipe them and move on.

Last week I saw something on Facebook that I can't remember the details of, but all that I thought when I saw it was "Where has this been all my life!? It would help me cut perfect cornbread pieces!" This was only the beginning of what I learned this week though.

In 2013, Mike Whitehead started a Kickstarter campaign for a new octogon skillet, branded as Finex. Somehow I've missed this for a while, but apparently the campaign was wildly successful and now they have their own website where you can buy skillets and grill pans with this unique shape. One thing that did catch my eye is a 1-quart dutch oven, but before I talk about why, I wanted to see what the reviews were like. Apparently, people love them if you read theie site reviews, but I wanted unfiltered results. I was happy to find this test, which looked for the best cast iron skillet.


I love how this article reviewed various pans, because you learn things about them that you just can't anywhere that you would have purchased these pans. In their tests, this pan just didn't hold up to the hype. So OK, it's got a cool shape, and I would be able to cut my cornbread other than eyeballing it, but otherwise it's not a pan I would buy.

So back to the 1-quart dutch oven. It's got a small size, but it's deep, which they say makes it perfect for many things, including lasagna for two. Lasagna in cast iron!? Worth it or not? Well, I'd say that depends on what else you thought of to use it for. To me, a 2 quart or larger would be better. Because the spoiled rotten chef discontinued the pot/pan set that I was missing to complete my new cookware, I'm considering this as my next cast iron purchase.

It would fill the gap between the 1-1/2 quart and the tall pasta pot, and fom what I've been reading would be wonderful for rice making.

As always, comments and suggestions are appreciated, so if anyone has experience with these in between sizes, please chime in!

Until next time...

Thursday, May 25, 2017

No Bake Missisippi Mud Cheesecake

First off, I know this isn't a cast iron recipe, but since I'm adapting not one but two recipes into a single one, I thought I'd share it here.


I needed a dessert for a going away dinner for one of my boyfriend's students, and after looking at the store, I wasn't excited about anything. Then I saw cheesecake. A little bity cheesecake at that, but boring. So I did what I often do at the grocery store, and did an internet search for cheesecake. The recipe I fell in love with said it takes 10 hours to make, which I just didn't have. I looked for no bake recipes and found Mississippi Mud Pie No Bake Cheesecake over at A Dash of Sanity. I was dismayed that my store didn't have chocolate graham cracker crust, so I got plain and knew I'd figure it out. By figuring it out, I meant I'd find a recipe to convert or replace it, which I did. This is the original recipe by Nikki on Tikkido.

Now for the fun part....

Crust

1-1/2 cups graham cracker crumbs
6 tablespoons butter, melted
1/4 cup brown sugar
1/4 cup unsweetened cocoa powder

Filling - bottom layer

8 ounce low fat cream cheese
1/4 cup white granulated sugar
8 ounces Toll House semi-sweet chocolate chips
1 teaspoon vanilla extract
2 Tablespoons butter, softened
1 - 8oz container Sugar Free Cool Whip

Filling - top layer

8 ounce low fat cream cheese
1/4 cup white granulated sugar
8 ounces Toll House semi-sweet chocolate chips
1 teaspoon vanilla extract
2 Tablespoons butter, softened
3/4 cup marshmallow fluff

Icing & Toppings

1/4 cup butter
2 Tablespoons + 2 teaspoons milk
3 tablespoons unsweetened cocoa
1-3/4 cups powdered sugar
1/2 teaspoon vanilla extract
1/2 cup marshmallow fluff
4 oz bag chopped pecans

Crust

Put all ingredients in a bowl, mix well, then press into a spring form pan. Refrigerate until needed.

Filling

Melt the chocolate chips in the microwave for 1 to 1-1/2 minutes and stir until smooth. Combine all ingredients for bottom layer, except the Cool Whip, in a large bowl and mix until combined. Fold in the Cool Whip. Put into pan on top of the crust. Repeat for second layer, reserving fluff until last. Microwave the fluff for about 30 seconds in a bowl at least twice the size of the fluff, to make it easier to work with, then fold it into the top layer mixture. Put it into the pan on top of the bottom layer of filling. Refrigerate.

If you're like me, now is a good time to stop and clean up, giving the cake time to firm up a little before you add the icing and toppings.

Icing

Mix the first 5 ingredients together in a bowl or large measuring cup until there are no lumps remaining. Microwave the fluff for 30-60 in a bowl big enough for it to expand. Pour a thin layer of the icing over the top layer of filling, using a spoon to spread it around. Top with chopped pecans, at the amount that makes you happy. Drizzle melted fluff over the pecans, then drizzle more of the icing over the top. Refrigerate at least 2 hours before serving.

I had extra icing left over, which I'll use for something else later. Who knows, maybe I'll dip Oreos in it, orange slices, pour it over ice cream...

If you try this, I'd love to hear how it turned out for you!

Monday, March 20, 2017

Brunswick Stew!

Things have been a little busy and I haven't really used my cast iron lately, but I thought I'd share a recipe that I just made over the weekend. My son is a Brunswick stew fanatic, but he's also very picky about it. There's this one restaurant about 45 minutes away that makes his perfect version of it, but of course we haven't lived in that area for going on a decade, so it's rare that he gets to eat it. A while back, we bought a Boston butt from someone whose child was doing a fundraiser, but when we pulled it to have sandwiches, it was a little bland and it was obvious they were cooked in a hurry. That's when I decided that the rest of it should be used for Brunswick stew.

I did this as a stew with ground meat, because to me, that's Brunswick stew. If you prefer your stew chunky, skip the

Before you use this recipe! Please read to the end. My yield on this recipe was just over 1-1/2 gallons, but for the amount of work you're about to put in, I wouldn't recommend cutting it in half. In fact, double or quadruple this recipe for big events! Give it away, freeze it, donate it to a soup kitchen, or hand it out to the homeless, but remember that it's the large batch stew that usually tastes the best. I'm going to give the recipe as I made it, but then I'm going to do a "what I'd do differently" section based on my observations. I'll also repost the recipe with my alternative versions as I tweak it, which you'll be able to search for with the label "Brunswick stew" if you're interested.

Brunswick Stew

2 pounds cooked Boston butt, preferably smoked
2 pounds chicken breast, see below
1 large chicken bouillon cube (or 2 small ones)
1 large vegetable bouillon cube (or 2 small ones)
2-3 cups water
2 (15 ounce) cans of whole kernel corn
3 (14.5 oz) cans of diced tomatoes
1 medium sweet onion
6 small potatoes
48 ounces of ketchup4 Tbs Paw Paws Snake Bite Habanero Hot Sauce (See note below)
2 Tbs smoked paprika
2 Tbs cayanne pepper
1 Tbs garlic powder
3 tsp minced garlic
32 ounces Blue Moon Bar-B-Que Award Winning Bar-B-Que Sauce
2 Tbs tumeric
2 Tbs yellow mustard
1 (15 ounce) can of cream corn

Chop the pork into small pieces, set aside. Boil chicken with bouillon cubes and enough water to cover the chicken in a small pan. Reserve stock and cut chicken into small pieces. Run both meats through a meat grinder (I used the large holes on the attachment to my Kitchen Aid stand mixer), and set aside. Open and drain both the kernel corn and tomatoes, then mix them together in a bowl. Trust me, it makes the next part easier, but it's still a little messy. Slowly feed the corn and tomato mix through the grinder, set on the lowest setting. Peel and cut the raw onion and potatoes into small pieces and feed them through the grinder as well.

Combine all the ingredients, except the cream corn, in a deep pot and bring them slowly to a boil, stirring frequently. Cook for about 10 minutes, then add the cream corn. (If you add it earlier, you're more likely to have issues with the stew sticking. Split into 2 batches (unless you have a very large crock pot), putting the first batch into the crock pot for 8 hours on low. Put this batch into freezer containers and replace with the 2nd batch, repeating the cooking directions.

What would I have done differently?

At this point, I think I want to reduce the hot sauce by half, and probably use roasted diced tomatoes for the next batch.

Regarding Paw Paw's Snake Bite Habanero Hot Sauce, I happened to have this on hand because I bought it at a local festival. It's the best hot sauce hands down if you want tons of flavor and not just heat. I've tried to find a web site where you can purchase it, but apparently it's not in any online stores anymore. The couple may still be selling it at festivals, but if you're interested in contacting them about buying some, you can find their contact information here.

Sunday, January 22, 2017

Who doesn't love steak in cast iron?

I'm a bit of a carnivore. OK, maybe that's an understatement. Sometimes when my boyfriend asks me what I'm in the mood for when we're going out to eat with friends, all I can respond with is "Meat!" so it's no surprise that I went to steak as my second dish in my new pan. I shop primarily at Publix, and they have a section in their meat department that is dedicated to ready to cook dishes like this flank steak, stuffed with mozzarella and spinach.


It's handy that they come in their own ready to cook container, but of course this wasn't the flavor I was looking for. I wanted that seared flavor and so I decided I would use my cast iron. Well, I didn't think about how difficult this was going to be to clean up either, because of the melty cheese,but that's a subject I'll come back to. Doesn't this look amazing? I tossed the meat in the hot pan, seared it a little on both sides, then tossed in the bedding spinach and a pack of steamed brussel sprouts that were in a mild butter based sauce.


When I took this picture, I was just about to flip them to see if they were getting too seared in the oven. This is when I realized that using meat that was stuffed with cheese in this pan wasn't the best idea, even though it smelled wonderful. Another few minutes and it was time to see how they turned out.

I'll admit, it's not the best I ever had, and I probably won't try this in this pan again, at least until the seasoning really forms a solid surface, but it was really good. I've bought these before and after trying to cook them this way, I think I'll leave them in the oven-ready pan they come in and save myself the clean up.

Here's the finished plate. Yes, I love the convenience of box mac and cheese, don't judge me! I'll make mac and cheese another time, since it's my favorite, but not in my cast iron!

Now the question is what to try next....


Thursday, January 5, 2017

Indian food, an obvious choice?

Tonight I finally got to use my new cast iron pan. As I'm writing this, the pan is in the oven getting a seasoning layer, since I cooked with tomato paste and it was obvious the seasoning layer cooked off. 

One of the reasons I wanted this new pan was so I could try my hand at Indian cooking. It's something we love but there's only one place in town to get it, and I just want to be able to cook anything, if that makes sense. Part of the fun of trying new recipes is the trial and error of getting them just how you want them. Sometimes the first attempt is an utter failure and there's so much to change that it's not worth it, and sometimes you get lucky and there's a home run and the recipe just needs minor tweaking. This recipe I started off with for butter lamb gravy was a home run.

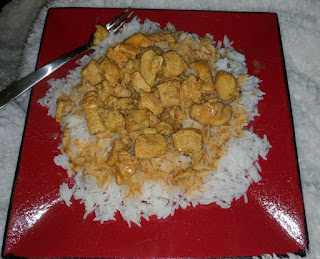
Here in Auburn, our grocery stores don't carry the lamb this recipe calls for, so I opted for chicken instead. It was a good thing I doubled the recipe, because out of four pounds of meat, there's enough leftovers for one plate. This is a dish that even looked delicious when it first started cooking!


OK, so the end result wasn't what I'd call perfect, and there's some things that I'll definitely tweak, because it wasn't too spicy for my son & I, but it was spicy enough for my boyfriend to live with so I will definitely make this again.

What would I change?

I think the gravy needs to be thicker and a bit more creamy. How will I do that? I think that I'm going to try to simmer the dish longer, or possibly I'll add a little corn starch or flour, to thicken it a little. Since the heavy cream goes in last, that's the perfect vehicle for it. The recipe came out great as is, but I think it could be better with this one change that could solve both the issues I had with the recipe.


So why is my pan in the oven being seasoned again after making this? Highly acidic foods eat at the seasoning. Since this recipe has tomato paste in it, it definitely qualifies. If you're using a pan that's had a long history of seasoning, you probably don't need to worry about it. Being that this is a new pan I cooked this recipe in, it hasn't had the chance to get that seasoning build up, so it cooked the seasoning right off it. I'll be hitting it with a couple more layers tomorrow to help for next time.

I'd love to hear other's experience if you try this recipe!

Thursday, December 29, 2016

History and Starting Over

As I write this, I'm starting over with cast iron. It's not that I've been completely without cast iron all these years, only that I've been limited to one pan, the pan I have loved and cared for but set aside for a single amazing use...cornbread. (I'll share the recipe I use later.) Yes, I know that I can use this pan for other things, but this pan is finicky, so I don't dare mess with perfection. It's got 25 years of great history, with only a few hiccups over that time, caused by the good intentions of others who "helped" by cleaning the pan.


For Christmas, I got this new, wonderful Lodge 5 quart deep skillet, which I've been looking at and drooling over for months. Now, even though this comes pre-seasoned, I'm keeping Sheryl Canter's post at the ready, and am thinking it's about time that I reseason my cornbread pan as well.

I'm starting this blog to document the good, and not so good, results as I go through this adventure, as well as the yummy recipes I find along the way. Strap in an join me. We may learn a thing or 10 together, and I'm always open to some great advice and tips.